Happy (belated) Valentine's Day!!! Thanks to all of you who replied to my facebook post. Your replies were quite helpful for today's post.
![]()
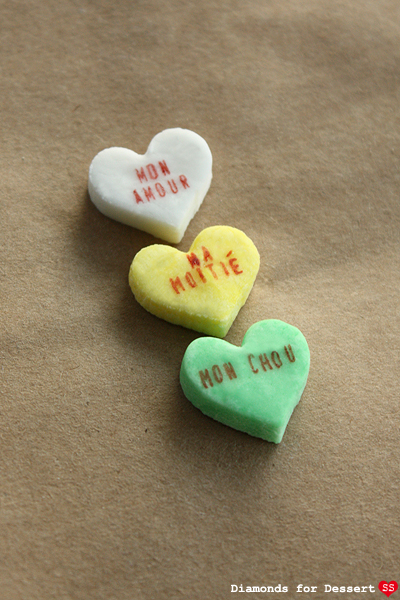
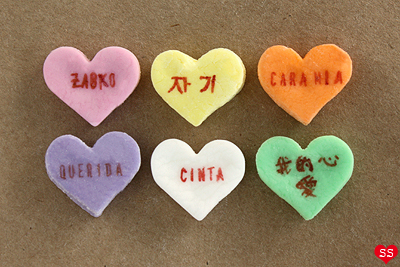
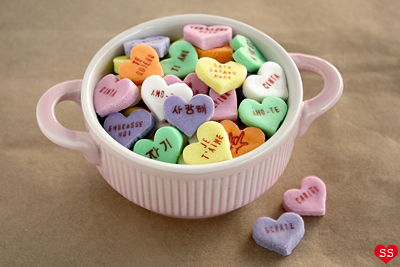
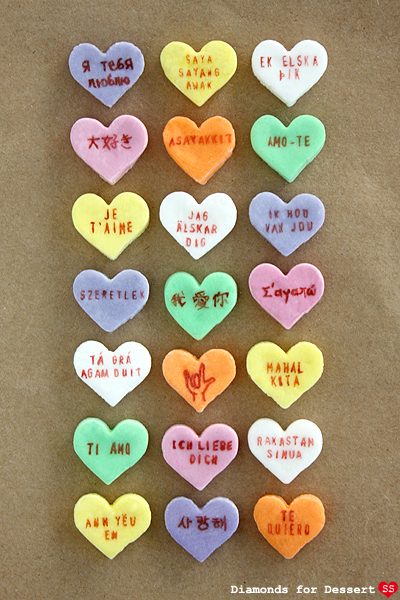
Every year, Conversation Hearts always feature some new messages to keep up with the times. But why stop with just English? I love learning languages, so I decided to combine that fascination for foreign languages with my Valentine's project for this year. I'm fluent in French and Chinese and I've learned basic Spanish, Italian, Japanese, and Hungarian, so a combination of my own knowledge, the awesome input from some of you, and Google helped me come up with the messages for these Multilingual Conversation Hearts.
![]()
![]()
![]()
![]()
I first came up with the idea when I noticed the leftover letters from my parents' Do-It-Yourself Stamp Kit sitting in a cabinet, waiting to be used. I saw that in addition to the normal letters and numbers, there were some special character stamps, like Ä, Þ, and Ɖ, and thought it'd be cool to incorporate the stamps into something on this blog. I guess I also had Valentine's Day candy on my mind as well because not long after that, I ended up with this idea.
![]()
These aren't an exact match to the actual candy, but they're pretty close (they're softer in texture). I can't really judge the taste because I used flavors different from the actual candy flavors (I basically found all the extracts I have and used one for each color). But these candies are totally fun because they're customizable in color, flavoring, shape, and message. Plus, the recipe isn't too difficult. This would definitely make a great project for next Valentine's Day :).
![]() "I Love You" from top L->R:
"I Love You" from top L->R:
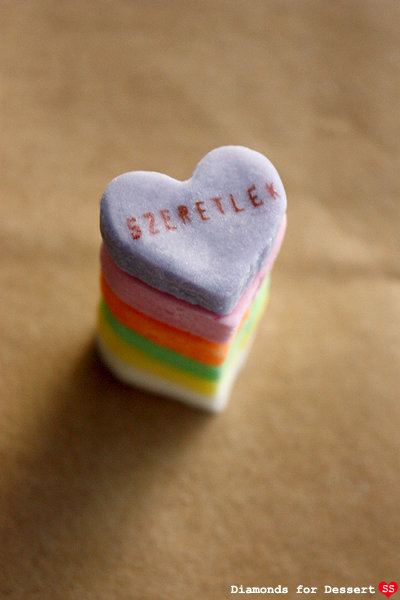
Russian, Malay, Norse, Japanese, Greenlandic, Portuguese, French, Swedish, Dutch, Hungarian, Chinese, Greek, Irish, ASL, Tagalog, Italian, German, Finnish, Vietnamese, Korean, Spanish
Conversation Hearts
adapted from about.com
1 tsp unflavored gelatin
1/4 cup water
1 tsp light corn syrup
1 lb powdered sugar, plus extra for dusting
assorted flavoring extracts
assorted food colorings
heart-shaped cookie cutter (ex. Linzer cookie or fondant cutters)
![]()
Combine the gelatin, water, and corn syrup in a small bowl and mix. Microwave 15-20 seconds, or until the gelatin dissolves and mix again. Pour this mixture into the bowl of a stand mixer with the paddle attachment. (Or if using a hand mixer, pour into a large bowl). Add 1 cup of the powdered sugar to the bowl and mix on low until the sugar is combined.
![]()
Add the remaining powdered sugar 1 cup at a time, mixing until incorporated, and repeat until the 1 pound of powdered sugar is used up (you should end up with a stiff dough). Dust a flat work surface with the extra powdered sugar and scrape the candy dough out onto the surface. Knead the dough on the surface until no longer sticky.
![]()
Split the dough into six pieces. To each add the color and flavoring extract of your choice, kneading it on a powdered sugar dusted surface until the color is well mixed and the dough is no longer sticky. When you aren't using a piece of dough, make sure to keep it covered in plastic wrap so it doesn't dry out.
(For the extracts, I added from 1/4 tsp to 1 tsp extract, depending on taste for each dough. If I used more extract, I ended up mixing more powdered sugar into the dough to make it less sticky. I stuck with the original colors: pink, yellow, orange, green, purple, and white. The corresponding flavors were: Pink=Strawberry, Yellow=Lemon, Orange=Orange, Green = Mint, Purple = Vanilla, White = Almond.)
![]()
Once done coloring and flavoring, place a piece of dough between two sheets of plastic wrap. Roll it out to between 1/8 inch and 1/4 inch thick. Use your heart cookie cutter to cut out hearts, placing the cut-outs on a parchment paper lined baking sheet. Roll up the scraps and cut out more candies. Then repeat with the rest of the dough. (If the cutter gets too sticky, wash and dry it.)
![]()
Let the candies dry for at least 24 hours. It is crucial that the candies are totally dry or else the food coloring later used to write on words will run. To test, bite into a candy. If it's still wet in the center, let dry for longer. At this point, to dry faster, turn up your oven to the lowest temperature (for me it's 170°F). Let it preheat. Once preheated, turn the oven off. Take your sheets of candy and place them in the oven with the door closed for 10-15 minutes. Remove and let totally cool.
Decorating Conversation Hearts
red liquid food coloring
toothpicks
Do-It-Yourself Stamp Kit
![]()
Method #1 (simple): Dip a toothpick in red food coloring and use it to write on the candies. I used this method for characters that weren't in my stamp kit, like for Chinese/Korean/Japanese/Russian/Greek/ASL, but you can always use it if you'd rather not use a stamp kit.
![]()
Method #2 (harder): Pick all of the stamps off one of the plastic boards that holds all the individual letter stamps (you can keep the stamper for your own use). Use tweezers to place stamps back on the holder to form your message (remember it goes on backwards to show correctly on your candy). Dip a toothpick in red food coloring and use it to color the letters. Place your candy on top of the letters, press down on the candy to make sure the letters stamp on, and remove. (If some letters don't show up too well, use a toothpick to draw it in).
Makes about 180 heart candies
![]()
![]()
![]()
![]()
![]()

Every year, Conversation Hearts always feature some new messages to keep up with the times. But why stop with just English? I love learning languages, so I decided to combine that fascination for foreign languages with my Valentine's project for this year. I'm fluent in French and Chinese and I've learned basic Spanish, Italian, Japanese, and Hungarian, so a combination of my own knowledge, the awesome input from some of you, and Google helped me come up with the messages for these Multilingual Conversation Hearts.


I first came up with the idea when I noticed the leftover letters from my parents' Do-It-Yourself Stamp Kit sitting in a cabinet, waiting to be used. I saw that in addition to the normal letters and numbers, there were some special character stamps, like Ä, Þ, and Ɖ, and thought it'd be cool to incorporate the stamps into something on this blog. I guess I also had Valentine's Day candy on my mind as well because not long after that, I ended up with this idea.
These aren't an exact match to the actual candy, but they're pretty close (they're softer in texture). I can't really judge the taste because I used flavors different from the actual candy flavors (I basically found all the extracts I have and used one for each color). But these candies are totally fun because they're customizable in color, flavoring, shape, and message. Plus, the recipe isn't too difficult. This would definitely make a great project for next Valentine's Day :).
Russian, Malay, Norse, Japanese, Greenlandic, Portuguese, French, Swedish, Dutch, Hungarian, Chinese, Greek, Irish, ASL, Tagalog, Italian, German, Finnish, Vietnamese, Korean, Spanish
Conversation Hearts
adapted from about.com
1 tsp unflavored gelatin
1/4 cup water
1 tsp light corn syrup
1 lb powdered sugar, plus extra for dusting
assorted flavoring extracts
assorted food colorings
heart-shaped cookie cutter (ex. Linzer cookie or fondant cutters)

Combine the gelatin, water, and corn syrup in a small bowl and mix. Microwave 15-20 seconds, or until the gelatin dissolves and mix again. Pour this mixture into the bowl of a stand mixer with the paddle attachment. (Or if using a hand mixer, pour into a large bowl). Add 1 cup of the powdered sugar to the bowl and mix on low until the sugar is combined.

Add the remaining powdered sugar 1 cup at a time, mixing until incorporated, and repeat until the 1 pound of powdered sugar is used up (you should end up with a stiff dough). Dust a flat work surface with the extra powdered sugar and scrape the candy dough out onto the surface. Knead the dough on the surface until no longer sticky.

Split the dough into six pieces. To each add the color and flavoring extract of your choice, kneading it on a powdered sugar dusted surface until the color is well mixed and the dough is no longer sticky. When you aren't using a piece of dough, make sure to keep it covered in plastic wrap so it doesn't dry out.
(For the extracts, I added from 1/4 tsp to 1 tsp extract, depending on taste for each dough. If I used more extract, I ended up mixing more powdered sugar into the dough to make it less sticky. I stuck with the original colors: pink, yellow, orange, green, purple, and white. The corresponding flavors were: Pink=Strawberry, Yellow=Lemon, Orange=Orange, Green = Mint, Purple = Vanilla, White = Almond.)

Once done coloring and flavoring, place a piece of dough between two sheets of plastic wrap. Roll it out to between 1/8 inch and 1/4 inch thick. Use your heart cookie cutter to cut out hearts, placing the cut-outs on a parchment paper lined baking sheet. Roll up the scraps and cut out more candies. Then repeat with the rest of the dough. (If the cutter gets too sticky, wash and dry it.)

Let the candies dry for at least 24 hours. It is crucial that the candies are totally dry or else the food coloring later used to write on words will run. To test, bite into a candy. If it's still wet in the center, let dry for longer. At this point, to dry faster, turn up your oven to the lowest temperature (for me it's 170°F). Let it preheat. Once preheated, turn the oven off. Take your sheets of candy and place them in the oven with the door closed for 10-15 minutes. Remove and let totally cool.
Decorating Conversation Hearts
red liquid food coloring
toothpicks
Do-It-Yourself Stamp Kit

Method #1 (simple): Dip a toothpick in red food coloring and use it to write on the candies. I used this method for characters that weren't in my stamp kit, like for Chinese/Korean/Japanese/Russian/Greek/ASL, but you can always use it if you'd rather not use a stamp kit.

Method #2 (harder): Pick all of the stamps off one of the plastic boards that holds all the individual letter stamps (you can keep the stamper for your own use). Use tweezers to place stamps back on the holder to form your message (remember it goes on backwards to show correctly on your candy). Dip a toothpick in red food coloring and use it to color the letters. Place your candy on top of the letters, press down on the candy to make sure the letters stamp on, and remove. (If some letters don't show up too well, use a toothpick to draw it in).
Makes about 180 heart candies